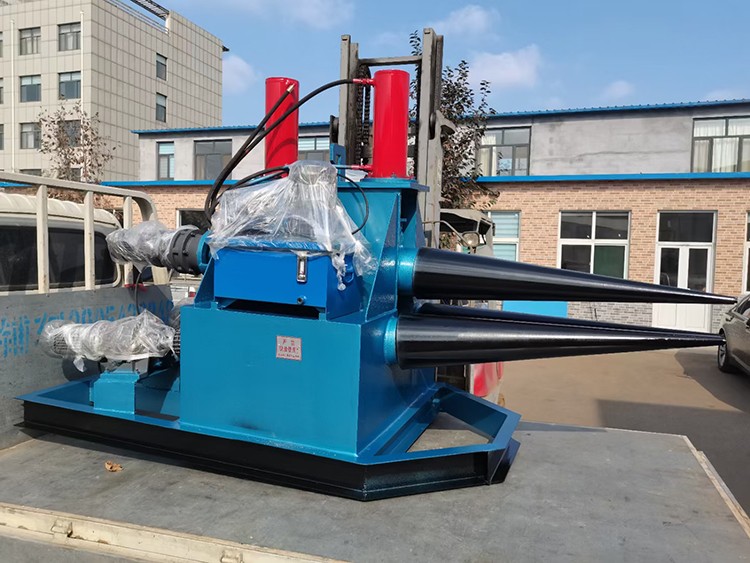
We are a professional manufacturer of rolling cone machine with over 10 years of industry experience. Today, we would like to introduce a method for quickly disassembling rolling cone machine:
Regular disassembly of rollers is a critical component of equipment maintenance, and an efficient disassembly method can significantly reduce downtime. This article outlines a systematic quick-disassembly process tailored to the structural characteristics of rollers, including preparation steps, operational procedures, and precautions, with the aim of assisting operators in safely and efficiently completing disassembly tasks.
1. Preparation
Tool preparation is a fundamental requirement for disassembly operations. The following tools must be prepared: Hydraulic jack (10–20 tons), specialized roller lifting device, set of hex wrenches, copper rod (diameter 30–40 mm), rubber hammer, bearing puller, and rags and cleaning agents. All tools should be inspected in advance to ensure they are in good working order, with particular attention paid to the load-bearing capacity of the lifting device and the hydraulic pressure status of the hydraulic jack.
Equipment status verification must be strictly enforced. Disconnect the main power supply and lock it with a tag. Release any residual pressure in the hydraulic system. Check that the roller temperature has dropped to room temperature. Record the current position parameters and clearance data of the roller as a reference for reassembly. Clean oil stains and debris from the roller surface and surrounding area to ensure a clear workspace.
Safety precautions must not be overlooked. Operators must wear safety shoes, gloves, and goggles. Place wooden blocks beneath the rollers as safety supports, prepare emergency stop devices, and ensure they function properly. When working in teams, clearly define roles and communication signals to prevent errors.
2. Disassembly Steps
Separating the coupling is the first step. Use an Allen wrench to loosen the coupling connection bolts, taking care to retain the two diagonal bolts and not remove them completely at this stage. After making alignment marks on the coupling mating surface, insert the specialized wedge-shaped separation tool and gently tap it to disengage the coupling. Completely remove the remaining bolts and carefully remove the coupling from the work area for proper storage.
Removing the end cover requires careful handling. Loosen the end cover mounting bolts in a diagonal sequence. When only the last two bolts remain, use a rubber hammer to gently tap the edges of the end cover to loosen it. Check for any hidden定位pins, and confirm there are none before completely removing the bolts. If the end cover is difficult to remove due to prolonged pressure, insert set screws symmetrically at the bolt holes and apply even force.
The bearing removal process has high technical requirements. Use a bearing puller to secure the inner ring of the bearing, ensuring that the puller claws are in full contact with the bearing. Slowly tighten the central screw of the puller and observe the movement of the bearing. If resistance is encountered, stop the operation and check for any missing fasteners. Do not strike the bearing directly; if necessary, use a copper rod as a force transmission medium to gently tap the outer ring of the bearing.
The removal of the rollers requires coordinated cooperation. Before installing the special lifting device, clean the oil stains from the roller shaft neck. The lifting device should be evenly secured, and rubber sleeves should be installed at the points where the steel wire rope contacts the rollers. Slowly lift the rollers 5-10 millimeters, then pause to check the balance. After confirming that everything is in order, continue lifting until the rollers are completely detached from the machine base, then move them to the designated storage area. When placing the roller, use V-shaped supports to prop up the shaft neck area.
3.Precautions
The sequence of disassembly directly affects efficiency. It is essential to strictly follow the sequence of disassembling peripheral components first, followed by core components. Do not skip steps or forcefully remove components that have not been loosened. If abnormal resistance is encountered, stop work immediately, identify the cause, and then continue. All removed bolts, washers, and other small components should be sorted and stored according to their installation locations.
Cleaning management is carried out throughout the entire process. After each component is separated, the mating surfaces should be cleaned promptly, the wear condition should be checked, and records should be kept. Lubricating grease should be stored in dedicated containers to avoid contaminating the work site. The surface of the rollers should be coated with anti-rust oil and covered with dust-proof cloth for storage.
Damage prevention requires special attention. During disassembly, the use of thermal processing methods such as oxy-fuel cutting is strictly prohibited to avoid altering material properties. During lifting and handling, rollers must not collide with other components, and areas with high surface precision requirements must be provided with additional protection. Precision components such as bearings should be immediately placed in protective cases after disassembly.
4.Troubleshooting Common Issues
When encountering rusted or stuck joints, first soak the joint surface with penetrating oil, then use a copper rod to gently tap and vibrate the area. For severely rusted areas, the thermal expansion and contraction method can be applied: use a heat gun to uniformly heat the outer component to 120–150°C before attempting separation. During the process, strictly control the temperature to avoid affecting material properties.
In cases where the locating pin is stuck, first confirm the type of pin. Cylindrical pins can be removed using a pin extractor, while tapered pins require determining the correct direction of tapping. For stubborn pins, attempt to rotate them slightly before extracting; avoid forceful tapping that could deform the pin hole. Damaged pins must be replaced and must not be reused.
For large roller balancing issues, calculate the center of gravity before lifting and, if necessary, add counterweights for adjustment. Maintain a low speed and steady movement during transport, and use a tow rope to assist with directional control. When working in confined spaces, plan the movement path and clear all obstacles.
The core of quick disassembly of rollers for cone crushers lies in standardized processes and meticulous operations. Through thorough preparation, standardized disassembly steps, and strict adherence to safety precautions, disassembly efficiency can be significantly improved while ensuring safety. In practical applications, operational details should be adjusted according to the specific model of the equipment, and a complete disassembly record archive should be established. Proper disassembly not only creates conditions for subsequent maintenance but also extends the service life of the rollers and ensures the overall operational stability of the equipment. As technology advances, more efficient specialized disassembly tools may emerge in the future, but the fundamental principles of standardized operations will remain unchanged.
If you are interested in rolling cone machine, please contact us.
 Address:Room 1202, Detaitang Building, No. 118 Huaguang Road, Zhangdian District, Zibo, Shandong
 WhatsApp:+8615653328535
 Wechat: +8615965331535
  E-mail:zs@sdsmachinery.com


